How to Optimize and Speed Up DaVinci Resolve in 5 Minutes
Would you like to understand how to optimize and speed up DaVinci Resolve so that you can work easily on very heavy projects and have smooth playback even on older computers?
If the answer is yes, you're in the right place!
In this article, I will guide you to discover some of the secrets behind DaVinci Resolve's optimization.
Ready to get started?
Good!
First of all, I'm gonna be damn honest with you! I don't like to make fun of anyone, least of all a person who is looking for a solution to their problems and aims for the highest quality content.
Why am I saying this?
You have to know that all will be revealed soon, and this is not intended to be advice on how to save money.
If right now you're thinking "By optimizing Resolve on my old macbook, I'll get the same performance as a much newer system and save a lot of money too”, I'm sorry to tell you but... it won't be like that.
I, myself, invested a fortune in a machine that was supposed to be able to tackle any project practically effortlessly.
The secrets I'm going to reveal to you will be of vital importance when you find yourself working, for whatever reason, on a machine that is not exactly recent and whose performance is not up to par by today's standards.
1 - Optimized Media
DaVinci Resolve's optimized media, as the word itself says, are media optimized.
Why optimize the media? Are they not good the way they are?
The answer is: it depends.
You should know that our system has more difficulty reading some files than others, and the difference is in the codec.
There are different types of codecs, some more compressed, some less compressed.
Without getting into technicalities that right now could only confuse your ideas, keep in mind that our system has much more difficulty reading a compressed file than an uncompressed file.
To give you a practical example, our system will find it much harder to read a 5GB compressed H264 file than to read a 50GB uncompressed ProRes4444 file.
So, in case our source media files are very compressed, we would be better off converting them into less compressed files.
It is at this very moment that DaVinci Resolve's "Optimized Media" function comes to our rescue.
So what do I have to do?
All you'll have to do is:
Click on Project Settings
Make sure you are in Master Settings
Scroll down and stop at Optimized Media and Render Cache
Select the same codec for both Optimized Media Format and Render Cache Format I recommend selecting DNXHR SQ in case you are working on a PC and ProRes 422 LT in case you are working on a Mac.
Generate Optimized Media
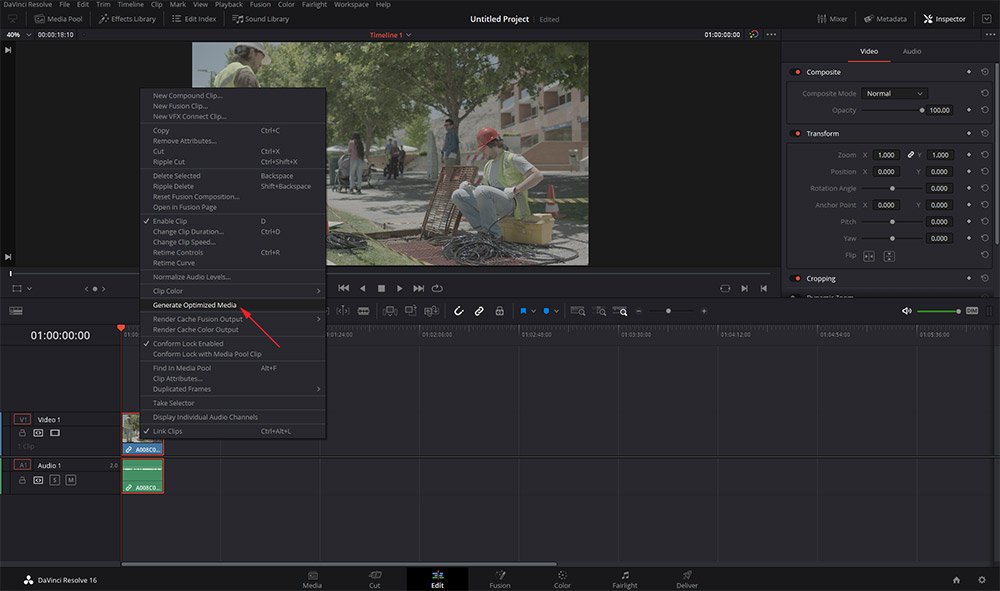
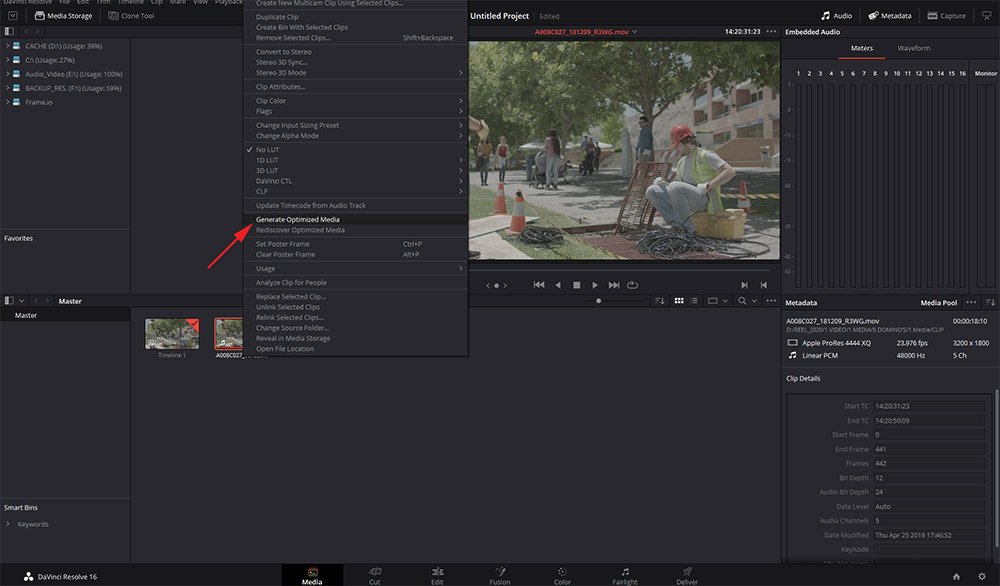
To generate optimized media on Davinci Resolve, all you have to do is select all the clips to convert, right click and select "Generate Optimized Media".
You can do this from both the Media section and the Edit section of DaVinci Resolve.
Use optimized media
After choosing codecs and generating optimized media, you'll need to tell Resolve to use these media if available.
To do this, go to Playback and click on “Use Optimized media if available”
2 - Render Cache
It doesn't matter how recent and powerful your system is, if you exaggerate the number of nodes when coloring or simply use very heavy ofx, the playback will start to be less fluid.
Fortunately, Resolve provides us with a very interesting feature: the Render Cache.
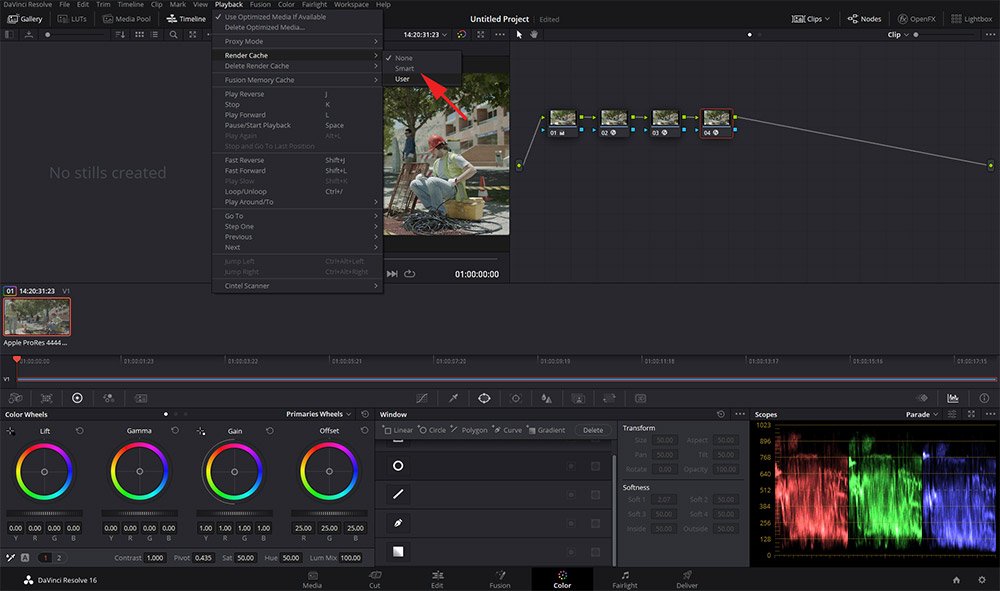
To start the render cache simply select all the clips that, after the excessive use of nodes and ofx have a less fluid playback, right click and select "Render cache color output".
Next, click Playback > Render Cache > Smart or User.
That's all! Now you're out of excuses, just get to work!
Download The Ultimate Guide to Building a Professional Color Grading Suite!
Building a professional grading suite may seem like child's play.
Apparently, everyone knows what to do.
If you think you already know everything about building a professional grading suite... congratulations! This product is not for you.
If, on the other hand, you want to build your own grading suite and find out all the elements you will really need to work better, attract clients and differentiate yourself from the crowd, this guide will become your Bible.
Investing a fistful of money to get pointed in the right direction is better than losing a truckload trying to find it on your own over months/years of searching.
Subscribe to my newsletter to get your Free Colorist Pack!
You will also receive updates on new products, giveaways, exclusive content, and much more!


