How to Improve DaVinci Resolve Performance in 1 Step!
Would you like to understand how to optimize and speed up DaVinci Resolve so that you can work easily on very heavy projects and have smooth playback even on older computers?
If the answer is yes, you're in the right place!
First things first, let’s start from the beginning…
The term “cache” is used in computing to describe a very fast hidden memory that is used to speed up the execution of an application.
The cache can understand which tasks you perform most frequently and, using an algorithm, it decides what information to keep and what information to discard.
This means that the next time that you perform that task, the cache will already have some of the information memorized and ready to use, and this speeds up the execution of the application.
The DaVinci Resolve render cache
The DaVinci Resolve render cache is simply a rendering cache.
What does that mean?
DaVinci Resolve allows you to render however many clips you like and in whatever format you like while the programme is inactive, for the purpose of having a smooth playback.
In reality, the render cache is only one of the tools that Blackmagic offers you to help to optimise and speed up your software.
Why activate the render cache?
It doesn't matter how recent and powerful your system is, if you exaggerate the number of nodes when coloring or simply use very heavy ofx, the playback will start to be less fluid.
How to activate the render cache
Click on Project Settings
Make sure you are in Master Settings
Scroll down and stop at Optimized Media and Render Cache
Select the same codec for both Optimized Media Format and Render Cache Format I recommend selecting DNXHR SQ in case you are working on a PC and ProRes 422 LT in case you are working on a Mac.
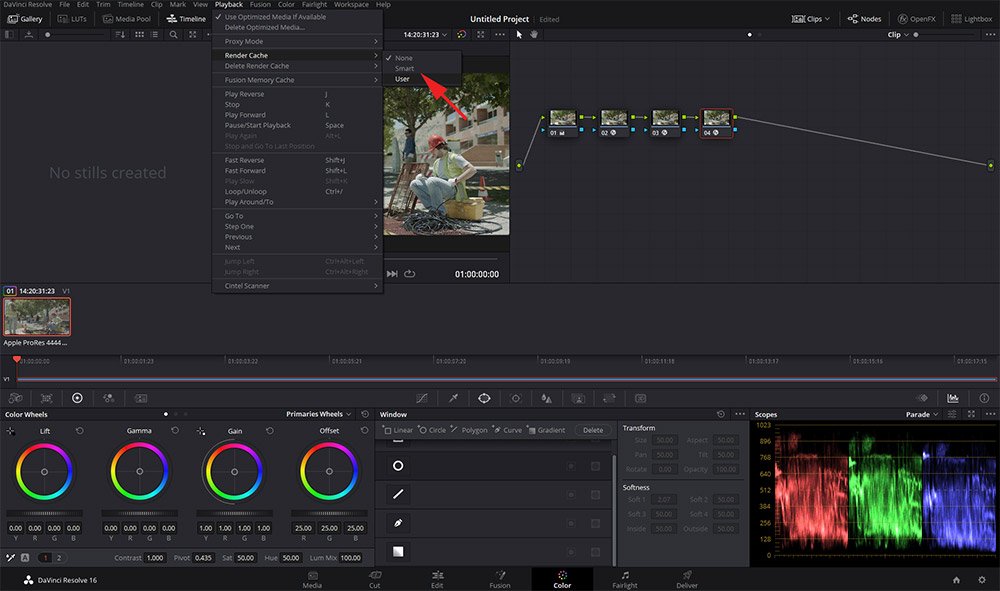
To start the render cache simply select all the clips that, after the excessive use of nodes and ofx have a less fluid playback, right click and select "Render cache color output".
Next, click Playback > Render Cache > Smart or User.
That's all! Now you're out of excuses, just get to work!
Download The Ultimate Guide to Building a Professional Color Grading Suite!
Building a professional grading suite may seem like child's play.
Apparently, everyone knows what to do.
If you think you already know everything about building a professional grading suite... congratulations! This product is not for you.
If, on the other hand, you want to build your own grading suite and find out all the elements you will really need to work better, attract clients and differentiate yourself from the crowd, this guide will become your Bible.
Investing a fistful of money to get pointed in the right direction is better than losing a truckload trying to find it on your own over months/years of searching.
Sign up to my Newsletter to get your Free Colorist Pack!
You'll also receive updates on upcoming Products, Giveaways, Exclusive Content and more!


